Custom Components GalleryNEW
Explore
Custom Components GalleryNEW
Explore 
In this Guide, we’ll walk you through:
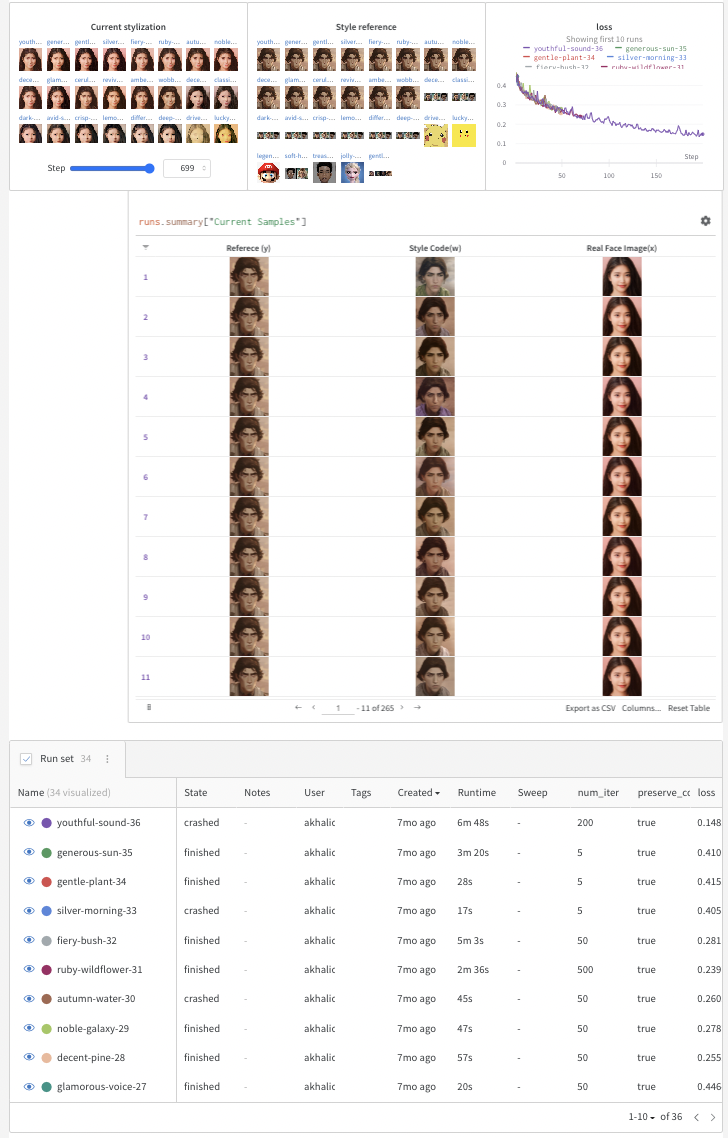
Weights and Biases (W&B) allows data scientists and machine learning scientists to track their machine learning experiments at every stage, from training to production. Any metric can be aggregated over samples and shown in panels in a customizable and searchable dashboard, like below:
Gradio lets users demo their machine learning models as a web app, all in a few lines of Python. Gradio wraps any Python function (such as a machine learning model’s inference function) into a user interface and the demos can be launched inside jupyter notebooks, colab notebooks, as well as embedded in your own website and hosted on Hugging Face Spaces for free.
Get started here
Hugging Face Spaces is a free hosting option for Gradio demos. Spaces comes with 3 SDK options: Gradio, Streamlit and Static HTML demos. Spaces can be public or private and the workflow is similar to github repos. There are over 2000+ spaces currently on Hugging Face. Learn more about spaces here.
Now, let’s walk you through how to do this on your own. We’ll make the assumption that you’re new to W&B and Gradio for the purposes of this tutorial.
Let’s get started!
Create a W&B account
Follow these quick instructions to create your free account if you don’t have one already. It shouldn’t take more than a couple minutes. Once you’re done (or if you’ve already got an account), next, we’ll run a quick colab.
Open Colab Install Gradio and W&B
We’ll be following along with the colab provided in the JoJoGAN repo with some minor modifications to use Wandb and Gradio more effectively.
![]()
Install Gradio and Wandb at the top:
Finetune StyleGAN and W&B experiment tracking
This next step will open a W&B dashboard to track your experiments and a gradio panel showing pretrained models to choose from a drop down menu from a Gradio Demo hosted on Huggingface Spaces. Here’s the code you need for that:
alpha =  1.0
alpha = 1-alpha

preserve_color = True
num_iter = 100
log_interval = 50
samples = [] column_names = [“Reference (y)”, “Style Code(w)”, “Real Face Image(x)”]
wandb.init(project=“JoJoGAN”) config = wandb.config config.num_iter = num_iter config.preserve_color = preserve_color wandb.log( {“Style reference”: [wandb.Image(transforms.ToPILImage()(target_im))]}, step=0)
discriminator = Discriminator(1024, 2).eval().to(device) ckpt = torch.load(‘models/stylegan2-ffhq-config-f.pt’, map_location=lambda storage, loc: storage) discriminator.load_state_dict(ckpt[“d”], strict=False)
del generator generator = deepcopy(original_generator)
g_optim = optim.Adam(generator.parameters(), lr=2e-3, betas=(0, 0.99))
if preserve_color: id_swap = [9,11,15,16,17] else: id_swap = list(range(7, generator.n_latent))
for idx in tqdm(range(num_iter)): mean_w = generator.get_latent(torch.randn([latents.size(0), latent_dim]).to(device)).unsqueeze(1).repeat(1, generator.n_latent, 1) in_latent = latents.clone() in_latent[:, id_swap] = alphalatents[:, id_swap] + (1-alpha)mean_w[:, id_swap]
img = generator(in_latent, input_is_latent=True)
with torch.no_grad(): real_feat = discriminator(targets) fake_feat = discriminator(img)
loss = sum([F.l1_loss(a, b) for a, b in zip(fake_feat, real_feat)])/len(fake_feat)
wandb.log({“loss”: loss}, step=idx) if idx % log_interval == 0: generator.eval() my_sample = generator(my_w, input_is_latent=True) generator.train() my_sample = transforms.ToPILImage()(utils.make_grid(my_sample, normalize=True, range=(-1, 1))) wandb.log( {“Current stylization”: [wandb.Image(my_sample)]}, step=idx) table_data = [ wandb.Image(transforms.ToPILImage()(target_im)), wandb.Image(img), wandb.Image(my_sample), ] samples.append(table_data)
g_optim.zero_grad() loss.backward() g_optim.step()
out_table = wandb.Table(data=samples, columns=column_names) wandb.log({“Current Samples”: out_table})
alpha = 1.0 alpha = 1-alpha preserve_color = True num_iter = 100 log_interval = 50 samples = [] column_names = ["Referece (y)", "Style Code(w)", "Real Face Image(x)"] wandb.init(project="JoJoGAN") config = wandb.config config.num_iter = num_iter config.preserve_color = preserve_color wandb.log( {"Style reference": [wandb.Image(transforms.ToPILImage()(target_im))]}, step=0) # load discriminator for perceptual loss discriminator = Discriminator(1024, 2).eval().to(device) ckpt = torch.load('models/stylegan2-ffhq-config-f.pt', map_location=lambda storage, loc: storage) discriminator.load_state_dict(ckpt["d"], strict=False) # reset generator del generator generator = deepcopy(original_generator) g_optim = optim.Adam(generator.parameters(), lr=2e-3, betas=(0, 0.99)) # Which layers to swap for generating a family of plausible real images -> fake image if preserve_color: id_swap = [9,11,15,16,17] else: id_swap = list(range(7, generator.n_latent)) for idx in tqdm(range(num_iter)): mean_w = generator.get_latent(torch.randn([latents.size(0), latent_dim]).to(device)).unsqueeze(1).repeat(1, generator.n_latent, 1) in_latent = latents.clone() in_latent[:, id_swap] = alpha*latents[:, id_swap] + (1-alpha)*mean_w[:, id_swap] img = generator(in_latent, input_is_latent=True) with torch.no_grad(): real_feat = discriminator(targets) fake_feat = discriminator(img) loss = sum([F.l1_loss(a, b) for a, b in zip(fake_feat, real_feat)])/len(fake_feat) wandb.log({"loss": loss}, step=idx) if idx % log_interval == 0: generator.eval() my_sample = generator(my_w, input_is_latent=True) generator.train() my_sample = transforms.ToPILImage()(utils.make_grid(my_sample, normalize=True, range=(-1, 1))) wandb.log( {"Current stylization": [wandb.Image(my_sample)]}, step=idx) table_data = [ wandb.Image(transforms.ToPILImage()(target_im)), wandb.Image(img), wandb.Image(my_sample), ] samples.append(table_data) g_optim.zero_grad() loss.backward() g_optim.step() out_table = wandb.Table(data=samples, columns=column_names) wandb.log({"Current Samples": out_table})Save, Download, and Load Model
Here’s how to save and download your model.
from PIL import Image
import torch
torch.backends.cudnn.benchmark = True
from torchvision import transforms, utils
from util import *
import math
import random
import numpy as np
from torch import nn, autograd, optim
from torch.nn import functional as F
from tqdm import tqdm
import lpips
from model import *
from e4e_projection import projection as e4e_projection

from copy import deepcopy
import imageio

import os
import sys
import torchvision.transforms as transforms
from argparse import Namespace
from e4e.models.psp import pSp
from util import *
from huggingface_hub import hf_hub_download
from google.colab import files

torch.save({"g": generator.state_dict()}, "your-model-name.pt")

files.download('your-model-name.pt')

latent_dim = 512
device="cuda"
model_path_s = hf_hub_download(repo_id="akhaliq/jojogan-stylegan2-ffhq-config-f", filename="stylegan2-ffhq-config-f.pt")
original_generator = Generator(1024, latent_dim, 8, 2).to(device)
ckpt = torch.load(model_path_s, map_location=lambda storage, loc: storage)
original_generator.load_state_dict(ckpt["g_ema"], strict=False)
mean_latent = original_generator.mean_latent(10000)

generator = deepcopy(original_generator)

ckpt = torch.load("/content/JoJoGAN/your-model-name.pt", map_location=lambda storage, loc: storage)
generator.load_state_dict(ckpt["g"], strict=False)
generator.eval()

plt.rcParams['figure.dpi'] = 150


transform = transforms.Compose(
    [
        transforms.Resize((1024, 1024)),
        transforms.ToTensor(),
        transforms.Normalize((0.5, 0.5, 0.5), (0.5, 0.5, 0.5)),
    ]
)


def inference(img):
    img.save('out.jpg')
    aligned_face = align_face('out.jpg')

    my_w = e4e_projection(aligned_face, "out.pt", device).unsqueeze(0)
    with torch.no_grad():
        my_sample = generator(my_w, input_is_latent=True)


    npimage = my_sample[0].cpu().permute(1, 2, 0).detach().numpy()
    imageio.imwrite('filename.jpeg', npimage)
    return 'filename.jpeg'
import gradio as gr

title = "JoJoGAN"
description = "Gradio Demo for JoJoGAN: One Shot Face Stylization. To use it, simply upload your image, or click one of the examples to load them. Read more at the links below."

demo = gr.Interface(
    inference,
    gr.Image(type="pil"),
    gr.Image(type="file"),
    title=title,
    description=description
)

demo.launch(share=True)
Integrate Gradio into your W&B Dashboard
The last step—integrating your Gradio demo with your W&B dashboard—is just one extra line:
demo.integrate(wandb=wandb)Once you call integrate, a demo will be created and you can integrate it into your dashboard or report
Outside of W&B with Web components, using the gradio-app tags allows anyone can embed Gradio demos on HF spaces directly into their blogs, websites, documentation, etc.:
<gradio-app space="akhaliq/JoJoGAN"> </gradio-app>(Optional) Embed W&B plots in your Gradio App
It’s also possible to embed W&B plots within Gradio apps. To do so, you can create a W&B Report of your plots and
embed them within your Gradio app within a gr.HTML block.
The Report will need to be public and you will need to wrap the URL within an iFrame like this:
import gradio as gr

def wandb_report(url):
    iframe = f'<iframe src={url} style="border:none;height:1024px;width:100%">'
    return gr.HTML(iframe)

with gr.Blocks() as demo:
    report_url = 'https://wandb.ai/_scott/pytorch-sweeps-demo/reports/loss-22-10-07-16-00-17---VmlldzoyNzU2NzAx'
    report = wandb_report(report_url)

demo.launch(share=True)We hope you enjoyed this brief demo of embedding a Gradio demo to a W&B report! Thanks for making it to the end. To recap:
Only one single reference image is needed for fine-tuning JoJoGAN which usually takes about 1 minute on a GPU in colab. After training, style can be applied to any input image. Read more in the paper.
W&B tracks experiments with just a few lines of code added to a colab and you can visualize, sort, and understand your experiments in a single, centralized dashboard.
Gradio, meanwhile, demos the model in a user friendly interface to share anywhere on the web.